How To Curate Your Photo Content Into A Wonderful Story

by
Kevin Landwer-Johan
Do you find it difficult to cull your photos? Many photographers fear the task of culling photos or they just ignore it.
In this article I’ll walk you through some of the process I use to cull photos and keep my hard drives from cluttering up.
To tell a superb story with a collection of your images requires you to cull photos and curate them. There’s no point in putting up every picture you’ve captured for your project. People will become bored because the narrative of your story will be blurred.
In my previous article, I wrote about the process of taking a series of photos that tell a story. ‘How To Tell Terrific Stories With Your Photos’ is all about meaningful content creation. In this article, I describe the process for choosing, captioning and curating photographs. I suggest reading my earlier blog post before continuing here.

Why It’s Important To Cull Photos
You want people to spend time looking at and appreciating the photo story content you have created. Therefore, it’s important to cull photos and have a content curation strategy. Without taking these actions it will not be possible to hold people’s attention for long.
Keep your story in mind. Telling a story with photos is a more abstract process than telling a story with words. You must cull photos out that are weak and add nothing to your narrative. This can be a painful process for many photographers. Focusing on the story you are telling will enable image curation that fits with your message.
Including too many photos dilutes your idea and distracts from the central theme. No matter how good you think a particular photo is, if it doesn’t fit with the story, you need to take it out. By all means keep these images, but use them in an alternative context. Fixing your attention on illustrating your narrative helps your audience understand your intention.
How To Organize Your Digital Photos
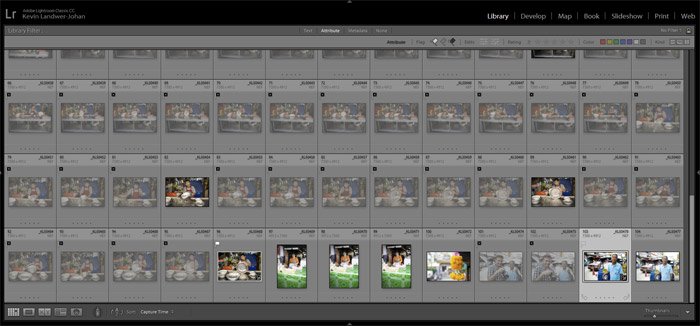
What to do with all your photos might seem overwhelming at first. If you’ve embarked on a long term photography project or covered a stimulating event, you many have hundreds or thousands of photos. Organizing your digital photos well helps you to take pleasure in the whole process.
Photo management software is designed to help organize your digital photos. The best programs will give you options for how to control your content curation process.
I find it most efficient to structure this operation by date. Every digital photograph contains a date stamp, so it’s a good starting point. You may decide later you prefer an alternative method. But at the beginning of the process it makes good sense to organize chronologically.
The first step is to load to your computer all the photographs you’ve taken for your story. This can take place all at one time or spread out over the course of your project. How ever you manage it, make sure you can find the photos you need easily. If you are working with Adobe Lightroom, (or similar,) setting up a catalog for the project will help. Keeping track of where your photos are stored can save time. It can make the whole experience more enjoyable.
Once you have all your images loaded and accessible it’s time to begin the photo story content culling.

What Does it Mean to Cull Photos?
Culling photos is the process of how to choose your best photos and disregard the ones you will not use. This can be a very challenging task for many photographers.
When making a photo story it requires you to be as objective as you can about your own photography. You must keep your story as your central focus. Base your decisions on how well each photo fits with your purpose.
Maintain a positive attitude about your photography while you cull photos. Many people become discouraged because they think they take so many photos they will not use. This is normal, even for experienced photographers. I am happy if I can keep 5-10% of the photos I take.
Some people take far more than others, so there’s more quantity to discard. The percentage of keepers is usually low. Accepting this helps keep you focused on your best pictures. You need to remove the photos you will never use.
Stick with your intention to produce the story you have taken your photos for. Learn from the mistakes you have made. Make use of the duds to help you see areas you can improve your photography. Look for techniques you need to work on more. Are taking a lot of out of focus or poorly exposed photos? Study the techniques and learn how to overcome these problems.
Paying attention to the photos you cull can inspire you to become a better photographer. By comparing similar photos, both discards and keepers, you will identify areas to work on.

How To Choose Your Best Photos
Seeing all the photos you’ve taken for your story the task of choosing your best photos may seem daunting. This is where you need a content culling strategy.
Making your way through hundreds or possibly thousands of photos is time-consuming. Even if your project is smaller and you don’t have that many pictures, the process can take time. Give yourself the space to make good choices.
Don’t rush through looking for what appears to be your best photos. Instead, begin by comparing similar photos and picking the best from that selection. I’ll often highlight four to six photos and bring only these pictures up on my monitor. This is a feature found in many photo management software applications. In Lightroom, it’s done by selecting a group of photos and pressing ‘N’ on your keyboard.
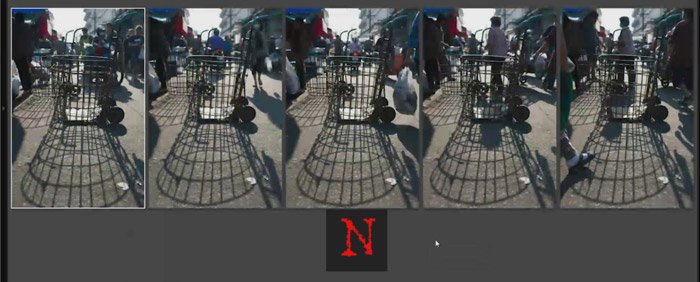
Once you have a smaller group of similar photos on your screen you can make comparisons between them. Look for obvious flaws in focus, exposure, and composition. Discard any that are out of focus. Study differences in composition between the pictures and select the one you like the most. Now hide the rest from view.
Repeat this process, selecting small batches of similar photos and comparing them. Choose the best and hide the rest. At this stage do not delete the images you discard. Hide them so they are not seen and are separated from your keepers. In Lightroom, I use the flag system to achieve this.

My Online Course to Teach You How
I won’t go into detail about how to manage this process. I have a practical course teaching my digital workflow. Please consider enrolling in this online course – Lightroom Digital Workflow.
Click here to learn more about this course. In the course I will walk you through my robust method of photo management. It will give you the confidence to make the best decisions about your photos.
As you cull photos be thinking about your story. You need to keep some wide, some medium and some close up photos. This will give you a more interesting mix. I covered this essential composition variation in my previous article.
During this stage of your editing aim to discard photos for technical rather than aesthetic reasons. In the next part of this process, you will carry out your image curation. This is where you’ll pick the photos you want to use in your photo story.

How To Curate Content
During this content curation process, you will continue to compare photos. You will choose the ones you think will work best to tell your story. There is no right or wrong way to do this but I’ll share with you some guidelines. Following these suggestions will help you curate a narrative with your photos.
Photo stories are as varied and diverse as written ones. You may have a collection of photos to tell a story akin to Moby Dick or Fun With Dick and Jane. It’s totally up to you which photos you think will best tell the tale you want to.
Think Like a Gallery Curator
Think of this task as if you’re the curator of an art gallery designing an exhibition of the photos. Look for both information value and visual stimulation in the photos you choose. Consider how the photos look when placed alongside each other. Is there a natural flow? Do they look good together?
Opening with a wide composition gives your audience an overall view of your subject or at least a good part of it. Choosing a close up as the first image can create curiosity and help draw the viewer into your story.

If you are constrained to use only a certain number of photos you must keep this in mind from the start. Seek to include a good mix of images. Give your audience a clear idea of what you want to convey by the time they’ve seen all the pictures.
A story that follows a distinct timeline is usually best curated chronologically. A day in the life, baking a cake or pruning roses are all examples. This type of story will make more sense to the viewer when the photos are displayed in the same order you took them. You will not help keep a strong thread through your story by mixing up the order.
One exception here might be to begin the story showing a photo of the finished cake or pruned rose bush. This will illustrate the end result. The second photo could then take the viewer to the beginning of the process. The following photos could then progress sequentially.
Create Your Own Order
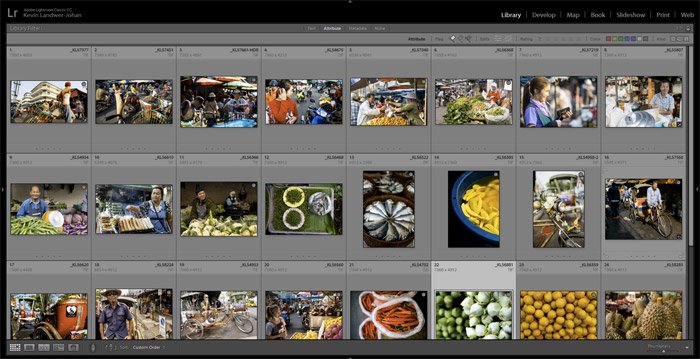
When there’s no need to keep a structured order you can remain more flexible with your choices. Look to arrange pictures that flow well together. Place photos with similarities together. Pictures with the same colors in them, or shapes. Do you have a series where your compositions are very much alike? Think about how many verticals and horizontals you have and how you combine them.
This process can be carried out on your computer with your content management software. Or you can print out your photos. You may find it more enjoyable to lay out all your photos on a table or on the floor to arrange them. Whichever method you use, take your time. Try many variations. The first layout you make may not be the best. Take a screengrab or a photo of each sequence. This will help you revert back to the same order of photos if you are not making improvements with subsequent layouts.
Write A Caption For Each Picture
Captions should further stimulate curiosity in a viewer. Good captions will draw people deeper into your story.
You don’t need to describe what’s obvious in the pictures, but seek to add more information. Provide context and meaning in the captions you write to accompany your photos. Always be accurate with what you write.
A photo may be worth a thousand words. But often well-written caption can bring a depth of understanding to what people can see in them. They can also help provide continuity to your photo story.
There’s no fixed length for a photo caption. But be careful to only include relevant text which relates to your story. Don’t repeat yourself. Once you have provided information in one caption don’t include the same in other captions.
Here on my photography blog I also like to include EXIF data relating to photos. This provides technical information about the pictures that many photographers find helpful.
Some software has provision to add captions to images. If your software does not, or you’re printing your photos for display, you’ll need to come up with another way to include your captions. If you’re not good at coming up with quality captions for your photos, try asking for help from a writing service like studycrumb.

What Will You Do With Your Photo Story?
Hopefully by the time you’ve reached the end of your photo curation stage, you’ll have some ideas on how you’ll share your picture story.
You can publish it:
- On your blog or website
- As a slideshow
- In a book
- As a series of prints on a wall
- Hang it in a gallery
- In a magazine or newspaper.
There are plenty of options to share your photo story in print or digitally. You may like to keep it private, but the best stories are made to be told.

Please let me know in the comments below if you are putting into practice what you’ve learned in this article and the previous one. I’d love it if you can share some links to photo stories you have online.
I will continue to publish more articles in this series about taking multiple photos rather than one at a time. I believe it’s a healthy mindset for photographers to think in more than single images. Learning to take many photos of the same subject, whether it’s for a photo story or not, will help you to improve your photography.

Photos grouped together to tell a story are powerful.
Thanks for sharing your tips.